Posted in iLesson, iPod and iPad Implementation, Screencasting

Area, Perimeter, and Student Created Tutorials

We’re moving into the downhill slide of school, which means geometry and measurement in math.  I like that these units fall toward the end of the year because they are more hands on, and typically more engaging.   We started with area and perimeter a couple of weeks ago.  While we did the standard practice activities, including marking out shapes in the hallway to calculate perimeter, I augmented with a couple of iLessons to keep the kids engaged.

Jungle GeometryAt the start of the unit, I taught the kids how to use the app Jungle Geometry.  This is a great app, with a wide variety of different geometry and measurement tasks.  My students used the area and perimeter tasks in the app this time, but we’ll use this app again when we do more of the geometry standards.  Jungle Geometry is a favorite of mine because I can customize the levels, measurement units and tools, and differentiate for each student within the app.  There are a ton of customization tools, making this perfect for my multi-level group.  You can read more about Jungle Geometry in my review here at FunEducationalApps.com.

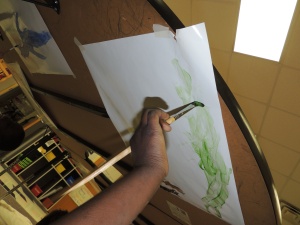
By far my favorite activity was the students’ performance assessment.  Students were given the task of creating a tutorial for how to find area and perimeter.  I had already created my own tutorial that the students utilized for a note-making activity.  Now it was their turn.  Students were given a rubric of what needed to be in the tutorial: definitions of both area and perimeter, formulas, examples and directions for solving problems, and example problems with pictures.  Students could work in pairs or alone – with the stipulation that I had to hear both voices if students worked together.  The results were amazing!

My students are very familiar with the app Explain Everything, so we used that as our platform for creating the tutorials.  Students utilized the shape and drawing tools, the text features, and even added some photos they took of the shapes we had measured in the hallway.  Narrations went from 40 seconds to 9 minutes.  And they all were great.

As a teacher, one of the best things about students creating tutorials, are the videos that aren’t right.  I had a student who kept calculating perimeter wrong every time, and I couldn’t figure out what he was doing.  Because he created the tutorial and had to explain his thinking as he did it, I was able to analyze his errors.  He was adding every side twice, because in the examples of rectangles I had given the class, each short and long side was added twice.  So when he found the perimeter of a pentagon, he added each side twice.  I never would have figured this out if he hadn’t explained his thinking in the tutorial.  It was an easy fix.  I just needed to know where the problem was.

Area and Perimeter Tutorial Rubric

Posted in iLesson, iPod and iPad Implementation

Meeting Michelangelo

I posted last week about Why I Use Google Chrome on the iPad.  That post spawned from our research project on Michelangelo.  And no, I don’t teach art.  I teach fourth and fifth grade special education.  The point of the project was to conduct a research project in a small group setting so that I could guide and model the steps an independent learner would take to begin a research project.  Honestly, I struggled with the topic selection – should I choose a science or social studies topic to span content areas and address more standards?  Or was it okay to choose this random artist that the rest of the world has been exposed to, but my rural students had never heard of?  I decided to give my students the art.  Why shouldn’t they, too, have the experience of fine art.


Strategic use of Pic Collage made the David school appropriate.

Now, there were several obstacles to overcome before I ever began this project.  First and foremost – a lot of Michelangelo’s artwork was done in the nude.  So not going there with my ten and eleven year olds!  Instead, I made good use of the Pic Collage app!  I found images of some of Michelangelo’s best known works – The Pieta, David, and The Sistine Chapel – using the search feature in the app, and then cut and pasted some decorative leaves for the artwork.  I liked Pic Collage for this because searching for the images, cutting out the leaf, and saving my work was all self-contained.  I didn’t have to go between the Internet and the app.

Pic Collage

Next, I dropped the images I had edited into a quick little slideshow using Sonic Pics.  This was only about a minute long, but let me narrate the images so that my students got a look at Michelangelo’s most famous works.  The kids viewed this on their iPads and had about 5 minutes to view the other images in the Michelangelo Dropbox folder I shared with them.  This way they could free explore the images and play with the zoom features.

As this was a group research project, we developed a series of questions we wanted to answer together.  I then chose some appropriate websites and placed them in a folder in Google Chrome.  (Yay for syncing bookmarks across devices!)  We discussed appropriate search terms and practiced asking the questions into the Google microphone.  We also utilized the accessibility features and speak selection options to have the websites read to us.    Read more about our actual research in the prior post.

Our last activity was not techy at all, but it was awesome!  After publishing, the kids painted the Sistine Chapel.  I taped some paper underneath my kidney tables and my students created their own masterpieces.  While we learned in our research that Michelangelo didn’t really lay down to paint the Sistine Chapel, we did it anyway just to get the experience of painting like that.  The kids (an adults who visited) loved it!

 Photo Mar 17, 8 25 32 PM Painting the Sistine Chapel  DSCN0346

Posted in Apps, iLesson, iPod and iPad Implementation

Why I Use Google Chrome on the iPad

I love my iPad, but I’m a Google girl at heart.  Safari works fine, and I have no issues with it.  But Google Chrome just fits my teaching so much better.  It has several features that just make it super easy to access and perfect for elementary classroom use.

Google Chrome appWe’ve been working this week on a research project about Michelangelo, the artist, not the Ninja Turtle.  (Give me a week – I’ll be posting about that next time.)  Being a special education teacher, research projects are normally the bane of my existence.  Turns out research projects are tough on a good day, but imagine not being able to spell your search criteria or read your sources.  Enter Google Chrome.

1. Google Chrome syncs with all your other Google Chromes – making bookmarks accessible across devices.  So let’s say I started a folder with child-friendly Michelangelo resources on my laptop at home and then added another site to it from my school iPad while waiting for a faculty meeting to start, and then found a few more sites after school on my school computer.  Since Google Chrome syncs across devices, each of my student iPads now has the same folder with the same content to begin our research with.  This means no messy searching, web address typing, or “Is this the right one?” for my students.

2. Google Chrome has a microphone option to search with.  It’s tough to research a topic if you can’t spell the words in your search criteria.  Unless my kids are typing verbatim from a notes page (and how original is that thought?), chances are they aren’t going to spell their query correctly.  Google Chrome removes that challenge.  With a little practice enunciating, my kids can ask their own questions as we research.  It was great to see where their thoughts went, beyond the general questions.  They had some really insightful questions, that I would never have thought to include in an elementary research project.  Just another example of why student ownership is so important.

Enable narration of text in  Settings, under the Accessibility menu.
Enable narration of text in Settings, under the Accessibility menu.

3. Accessibility – okay this isn’t Google Chrome, but fits into the post beautifully.  I hope everyone is aware of the Accessibility options on the iPad.  In the Settings menu, users can choose to turn on the Speak Selection in the Accessibility menu.  After doing this, students can highlight the text they want to have read aloud, and simply tap Speak to hear the narration.  We found that we had to slow the voice way down in order to have it read slow enough for us to comprehend and make notes.  As a side note, I thought the navigation of tapping and dragging to highlight whole sections of text would prove to be difficult for my fourth graders.  Not at all.  They were able to do so with ease.

Google Chrome just makes my job a little bit easier.  Anything that makes learning more accessible to my students is worth a try.  Plus, their research papers are coming out great.  Check back next week to see how the rest of the project went.

Posted in Apps, iLesson, iPod and iPad Implementation

Oh The Snowmanity! A Great App for Teaching Point of View

snowmanityJust a quick post about an app that is currently free.  Oh the Snowmanity! is a super cute story telling about the life of a snowman, through the snowman’s eyes.  The rhyming story is written in an engaging font that bounces around the screen and is narrated by an expressive voice.  It has a few interactions for readers, but the app is mostly about the story.  And the plot is great.  It tells the woes of a snowman’s life in a way that readers have probably never thought about.  From wondering why he’s got buttons but no jacket, to the horrible thing his new friend the dog does, the story is a really great example of how point of view affects the story.

My Pinterest board is currently full of ideas for winter writing.  Oh The Snowmanity would fit beautifully with a writing prompt like “If I lived in a snow globe…” or the prompts about melting snowmen.  We used it with our fifth graders today.  They’ve just done a writing project on perspective and building a snowman from the ground up.  Today we tried a Quick Write and asked the students to write a journal entry from the point of view of the snowman.  We used this app to get them started and give an example of point of view.  I think the biggest hook was the page of the book that talks about the beauty of the snow fall, but then tells how the snowman was freaked out by the bits of flesh falling on him.  It was definitely a light bulb moment for the my kids!  If you are looking for a great way to ease into integrating technology, this would be a great place to start.  Grab it for free before it goes back to full price.

snowmanity2

Posted in iLesson, iPod and iPad Implementation, Paperless

Lines and Angles at the Amusement Park

We finished up lines and angles a while back, and I’ve been meaning to share my student’s awesome final quiz.  We had already located angle types in the classroom and taken photos of them.  To reverse the students’ thinking, I gave them a photo and they had to identify examples of the four angle types (right, obtuse, acute, and straight) as well as the three line types (parallel, perpendicular, and intersecting).  I could have done this using a basic worksheet, but instead we went paperless.

educamUsing the Educam app and my Ken-A-Vision Document Camera, I placed a photo of a roller coaster track under the camera and sent it to my students’ iPads.  Their task was to use the pen and text tools to find, trace, and label an example of each of the above items within the one picture.  Some even discovered the arrow tool and used it to be more precise with their labels.  They loved it!  After finishing up the quiz, students saved their photos and uploaded them to Dropbox.  It was fun, engaging, and totally paperless.

Image
Students identified four types of angles and three types of lines.


Students annotated the photo using the Educam app.


Posted in iLesson, iPod and iPad Implementation, Screencasting

Angles in the Real World – or at least in my classroom

Geometry is always a bit more fun to teach than other math units.  With the implementation of Common Core – I’ve really had to hustle to get everything in.  This week we worked on identifying angle types.

Students took photos using the iPad of various angles types they found in the classroom.

Students began by using a podcast from the Tennessee Department of Education to note-make.  Given the podcast Identify Acute, Obtuse, and Right Angles, students watched the podcast twice.  First to observe, next to make notes.  Students were given the explicit purpose for note-making: identify the four angle types and their general measurements.  Students also had to be able to tell me what unit we measure angles in.  After confirming the students’ notes, we moved on to real world application of the skill.

Students were tasked with using the iPads to take photos within the classroom of the various angle types.  It turns out that obtuse angles are fairly hard to find in a typical classroom.  After locating the angles, snapping a picture, and checking them in the camera roll students had to create their own instructional videos using their images.

doceriUsing the Doceri app, students uploaded their four images to different slides.  They then narrated and annotated the slides as they recorded their videos.  For my modified math group, students had to simply trace the angle in each photo using the pen tool and then tell the measurement of that type of angle.  The videos came out great.  You can check out a few at these links:

Students created videos annotating their images and narrating each slide.

M Angles Video

J Angles Video

Posted in Apps, iLesson, iPod and iPad Implementation

Coordinate Grids

The week or so before the holidays is always a little… most teachers can fill in this blank with any number of words!  Because of this chaos, I typically try to do something highly engaging and honestly, something not too terribly hard.  This year we worked on coordinate grids.  Of course, I tried to include as much tech as I could, to hold both the students’ and my own attention.

2013-01-11_2130We started the mini-unit with a note-making activity.  Students watched a video segment from DiscoveryEducation.com called Rectangular Coordinate System.  (Searchable with the tags: coordinate grid, grades 3-5 – it is a video segment lasting 11:34).  The video segment does a great job of showing the parts of a coordinate grid and giving examples of how to find ordered pairs on the grid.  The purpose of the note-making activity was to define the vocabulary words: x-axis, y-axis, coordinate grid, and ordered pair.  They also had to tell how to find an ordered pair on the grid.

2013-01-11_2135After some instruction and practice in our interactive notebooks, it was time for a little bit of independent work.  Of course, there’s an app for that!  I used the app Butterfly Brunch as our independent practice app.  (This app is also available as part of a set of apps in Maths Attack Vol. 2.)  Students must move a butterfly to a given ordered pair to feed him his snack.  It’s a simple game that allows for students to correct wrong answers.  It is best used in a small group where the teacher can monitor the accuracy of the butterfly feedings.

Our performance assessment featured my new favorite classroom tool, the Ken-a-vision document camera and Educam app.  I posted before the holiday craziness about getting to test out this great device (see here).  Lucky for me – I get to keep using it!  With this unit I put a blank coordinate grid under the document camera and and sent the image to the students’ iPads.  I worked with students to begin identifying ordered pairs.  The students were given a list of ordered pairs to plot on the coordinate grid using the pen tool, and then uploaded their saved images to our Dropbox folder.  The assessment itself was to simply plot the points.  The fun part of the activity was after uploading the completed grid, students had to go back and connect the dots, in the order that they were plotted.  They loved the finished product!  And it of course lent itself to the season.

Students had to plot a given set of ordered pairs using the Educam app and upload their image to our Dropbox.
Next, they had to connect the points in the order in which they were plotted.  They were quite happy with the results!
Next, they had to connect the points in the order in which they were plotted. They were quite happy with the results!

We did have one other, completely not techy, activity that the students loved.  We played a game called Candy Grab – using a blank coordinate grid, students placed M&Ms on each of the intersections in the grid.  Working in pairs, they took turns rolling dice.  The red die was the X-axis coordinate, the green die was the Y-axis coordinate.  Students had to find the ordered pair and if there was candy at the point, they got to grab it.  There was candy involved, I’m sure you can guess how well this game went over!  We do recommend using plain M&Ms though – turns out the peanut ones roll unpredictably!

After rolling dice to create an ordered pair, students got to grab the candy if they could plot the points!

Overall, the unit went great and was a nice way to round out our math instruction before the holiday.  It kept the students focused, well behaved, and addressing standards – all difficult tasks the week before the holiday break!

Posted in iPod and iPad Implementation

Don’t Forget the Routines

Another year is upon us, and as usual, I’ve completely forgotten how much training and instruction goes into the simple rituals and routines that in May seem so commonplace.  As I thought about what I could write a post about this week, I decided to focus on the little lessons that are essential, but easily overlooked, in a technology rich classroom.  For those teachers just rolling out iDevice classrooms and for those like me trying desperately to get back into our own routines, don’t forget some of these important lessons.

Be Consistent .  It is imperative that when teachers begin incorporating iPods or iPads into the classroom, that they only be used for education.  The minute kids learn that they can get away with playing other apps, listening to other music, or searching other sites during instruction, they will take every advantage.  I am very strict about my One and Out policy.  I tell the kids in baseball they get three strikes; in iPods they get one.  I will give you one warning about misbehavior with the iPods, and then you are out.  I take the iPod, and you get book work or a worksheet on the same topic.  It generally takes one or two kids being out, and I don’t have a single behavior problem again.  But, the kids have to know you are serious and consistent.

Create a function button anchor chart for easy reference. Include the video/music function buttons as well as other common icons for your class.

Teach Function Buttons.  I assumed that all kids know which button is play and which button is pause.  Turns out, this is not always common knowledge.  On the first day you use a podcast, video, or music, be sure to plan time to review the function buttons (rewind, fast forward, play, stop, pause, and record).  For younger grade levels, create an anchor chart for easy reference of the function buttons.

Never “Play.”  A teacher doesn’t ever plan to just “play” at school.  Everything you do has educational relevance.  The same should be true of the times you plan to use the iPods/iPads.  I never refer to the kids “playing” on the iPods, and my students never ask to “play” on them.  We “use” the iPods, we “explore” with the iPods, we “learn with” the iPods; we never “play” with them.

Plan a Free Explore Day.  Kids will be kids.  We know this, so we need to plan for this.  Avoid the inevitable fight when the kids go off task and start using the apps by planning a free explore day.  Plan for and lead a day where the kids get a chance to use a variety of apps and give them a chance to do a little exploring on their own.  Go into the free explore day with a handful of apps you think the kids will love and actually teach them how to use them.  After making students independent at the use of these handpicked apps, you can trust that if you ask early finishers or small group stations to work with a particular app, they’ll know how to and won’t need additional instructions.  Don’t forget to give the students some time to explore the apps on their own.  They are going to do this eventually – you might as well plan a time to do it, instead of having them free explore in the middle of a lesson.

I love, LOVE, teaching with iPods and iPads.  Part of why I love it is because of how smooth my classroom runs and how little classroom management I have to do when I have the devices out.  This ease of use comes with practice of our routines and procedures and consistency all year long.